Monday, March 16, 2015

TBB: Sour Cherry Pie Day


Super Delicious Sour Cherry Pie. 
This is like the 3rd fruit pie I have ever made!


This time, I made the pastry using Rose's hand method.  I followed instruction exactly. 

Before I was pretty confused when I read the instructions. However, when I saw Joe Pastry blog post and step by step photos, suddenly everything made sense! Yay! :D  

I have to say that this is now my favorite pie crust recipe! It's the very BEST imo - so flaky and delicious! This is what pie crust should be - All Butter (no shortening!)  


Put the cold butter and cheese breadcrumbs into the bag


And roll with rolling pin. This is very fun! 
Except I feel like I wasted a ziploc bag.. expensive you know..ziploc bag use for only 30mins. 


I added the cream and cider and still very dry. Maybe my cream is not very liquid but thicker. So I added 2 tsp of Vodka.. cos American Test Kitchen says so.... :)  

Wrapped the dough into 2 separately and placed in freezer.

Friday night after work, about 8pm, I made the cherry filling using 2 jars of Morello cherries. I tasted one when I opened the jar, it was a bit tart and the water/syrup that it was soaked in wasn't very sweet. 

So I reduced sugar by 25g and also added some Griottines (which I think is Morello cherries soak in kirsch liquor).  While I was cooking, I found it on the thick side and I wasn't sure how thick/liquid it should be for pie filling..since this is my first time making it and plus I didn't use frozen or fresh cherries.. Raymond & Tony suggested that I should add a bit more juice..which I did.. And in the end, I had more pie filling (weight) than stated on recipe..since I didn't weigh the cherries with juice...and some Griottines juice too.


After I turned on the aircon - to get ready to roll my pastry. 

When my son found out I turned on the aircon, he came in with all his toys to keep me company in our tiny kitchen space. Very difficult to walk around with him on the floor like this....


I rolled the pastry to 12".... I had a 12" cake board underneath..so I can flip over to the pie plate.


Flipped over to the pie plate..and place into fridge to rest. 


Next, I took out the other dough and roll into the required size. 
I used my multi pasta cutter which I bought for cake decorating purposes...not so much for making pasta..

This way I don't have to measure 3/4"..how many pieces.. very headache esp. my son is occupying almost the whole kitchen floor and singing very loudly..and I had to be careful not to dust flour on his head! 


After cutting the lattice strips, I placed into the fridge to rest again. 
By then, my son was lying on the kitchen floor relaxing. 


1 hour later, scooped the cherries into the pie and did the decorative lattice work..and then I realised that I have to rest the pie again for at least 45 mins! Wahhhh..  (I wanted the pie to be ready for Saturday's Pi Day.. 3.14.15 :) 
So in the meantime, I got my son ready for bedtime.


45 mins later, cut a round foil and placed it around the sides. 
Sugared the hearts only.. and into the oven it went!


Ta-Da!!!  All baked! 
I'm glad only a bit of the juices flow out. :) 
Since it was almost 2am when the pie was done, I took it to my bedroom (again!) for it to cool down...so the stupid lizards will not have any chance at all to get close...


Initially I was worried my pie would be too dry, however, when I cut into in the next day, it was juicy and perfect, just the way I like it. 


See..how flaky Rose's pie crust is! I love it!
I'm a crust person..so crust is most important to me. :) 


This is the best pie I have ever eaten and now my favorite pie to date.. I considered it better than apple pie now! The addition of Griottines gave it the extra oommph...esp when I bite into one and taste the liquor. LOL! I didn't know cherries can be so delicious as filling..!  I gave my friend 2 slices and she said it was very good, perfect balance of sweetness and tartness. 

I love it so much I think I'm going to make it again this weekend for our Church gathering. :)  Good thing/food is meant to be shared isn't it? 


Monday, March 9, 2015

TBB: Caramel Buns

I wasn't sure if I wanted to bake this for the week. The word sticky caramel makes me think of desserts that are icky sweet.  Icky sweet desserts are not popular here since all the reports about how bad sugar is and I was worried nobody wants to eat them. But I made them nonetheless because I felt as if I didn't submit my homework if I don't make them. I'm very glad I did make them! They are SOOO GOOD!!


I made the sponge on Thursday night.


Flour over it..and let it rest for 1 hr..(I think..or longer?)


Then mix all the ingredients and let the dough proof for 1-2 hrs.


It was getting pretty late..so I skipped the folding part, but fold the soft dough in the oiled plastic bag.
And into the fridge it went to rest overnight.  Next morning, it was all puffed up and I had to press it down.


Friday night after work, I soaked the raisins in rum and boiling water for 1 hour.
I soaked double amount of raisins...because I had the intention to reduce the sugar quantity.
Then I toasted the pecan nuts too.


I rolled the dough into the stated length/width.  
(BTW, I used organic 12% bread flour for the dough, but I used the local bread flour for dusting).


I put in more raisins and pecan nuts and reduced the sugar by 20g.


I had fun with the dental floss..cutting up the dough!  :D 
This went into the fridge to rest. So I can bake for breakfast next morning.


Not sure if it is because of the organic flour or what, but the dough proofed really fast..even in my fridge...  The next morning, they were already all puffed up and doubled in size. I wondered if I needed to proof for 2 hrs as the instructions mentioned?  In the end, I just waited till room temperature around 1 hr and placed the buns in the oven to bake.


Thank goodness I followed Rose's instruction to use the foil under, because I had a hard time taking the hot ramekin (with hot water) out of the pan..and had to lift the foil up instead. My bread came up to the top of the pan during baking. 


Quickly separate them individually...and glaze.


Make the caramel. 
I complained on FB about worrying that caramel will make the buns too sweet and wanted to make half batch..blah..blah..blah. 
But in the end, after all the complaining, I still made the full batch!!! 
Seems that I like to complain a lot but always end up following the recipe anyway...LOL!  


Caramel all done! 
Oh ya, I added salted butter and also 1/4 tsp of salt with the vanilla. 


I had my first bite and it was like WOW!!! Sooo GOOD! Surprisingly GOOD! 
Soo Yummilicious! (is there such a word?)
Perfect balance of flavors!!
Sweet, (of course it is sweet, it's caramel! duh!) 
but not super sweet and pairs extremely well with the brioche buns and pecan nuts.  

Then I posted this photo on FB to tempt everyone else.. Wahahahahahaha! *evil grin*


More Caramel Buns anyone? 


Fluffy broiche ..
I'm glad I added more pecans and raisins because they seemed to be buried in the dough..


Left over caramel..hardened, so I ate some up like caramel candies..


These caramel buns are really delicious! I ate like 3-4 buns that day.. (but after felt gastricy the next day..simply because I over ate... also had heavy dinner and later hot cross buns which I made the same day too! I sound so gluttony..lol!)

Will definitely make these buns again and again and again!  But I just have to make sure I don't stuff myself with them again but savour them slowly...but it's really hard not to ..esp. when these buns are TDF! 


Wednesday, March 4, 2015

BB: Rosemary Foccacia Sheet, Page 205.

I have a confession to make..I bought Rose's Bread Bible since 2008 but I have not flipped over a single page! :p  It was in cold storage until now (same with the Pastry Bible!). Glori recently set up a bake through Bread Bible group for Alpha Bakers and now I get to dig it out from deep inside the cupboard and finally read my first recipe. LOL!   

So our first recipe to bake from Bread Bible is page 205, 
Rosemary Foccacia Sheet. 


I have recently cultivated sourdough and had been having fun using them and feeding them. They are my pets now.  Instead of discarding part of the sourdough during feeding, I decided to use it in place of the yeast mentioned in the book. I used 15% of the flour weight and then do the necessary adjustment for flour and water respectively. 

The dough was pretty wet and had to use paddle. Took 20mins to get stuck to the paddle like this. At first I was watching it then I grew tired and bored and walked away to chat with other alpha bakers on FB group. I heard some noises and ran to the kitchen and saw my mixer walking around the counter top on its own! Scary. Thankfully my mixer didn't walk off the counter top!  


After it is transferred to an oiled glass bowl for proofing.  

And I brought my son out - his usual routine - same shopping centre and McDonalds every week.


I came back 3 hrs later, it proofed ..over proofed..to 3x size! Yikes! 
Also due to weather being very hot & sunny that day too. 


I pour into a sheet pan and tried to push the sides around. I think somehow I only pushed the sides and not the centre..the centre no matter how i try to push it won't budge!  Then I planted rosemary leaves on the bread dough...literally... LOL! (..hahaha... I read wrongly....somehow I remembered the garlic part which was supposed to press it down but ended up pressing the stalks of rosemary leaves down instead cos I forgot about the garlic....LOL!)  After I poured some EVOO onto the top of the dough and into the oven it went.


The foccacia freshly out of the oven. 
Sorry..I couldn't help it..I nibbled on some! 


And I nibbled somemore........


And in the end..I nibbled all the crispy sides!!  
I cannot help it! It was so good fresh out of the oven!
Esp. the sides, so crispy and chewy at the same time.
I couldn't eat dinner that night...my stomach was so bloated with bread & water. 


These were the left over bread in the centre of the dough. 
Fluffier and thicker cos I couldn't seem to push them out.


This is a very delicious bread, fresh out of the oven is heavenly.
I couldn't stop eating it.  The next day the bread remained soft, but however, it turned a bit soggy due to the EVOO.  Still better eaten fresh imo.


Monday, March 2, 2015

TBB: Hamantaschen (for purim)


First I must apologise for not making these cookies into traditional triangular shape. Because all my cutters were kept so neatly away during CNY spring cleaning, that I had a hard time trying to locate the round cutters!  In the end, I only had the pineapple tart cutters on hand cos these were the ones I used during CNY to make pineapple tarts.

I made the Apricot Lekvar two days before making these. I was complaining about making apricot lekvar again on Facebook how the previous batch stayed in my fridge for 3 years and when I used up the last bit, I was very happy.  But in the end, after all theat complaining, I still made the Lekvar..LOL! Go figure. I was running a fever that day and high on flu meds. My helper was next to me and telling me that she will do it for me because she was worried I was stirring the pot and the pot was moving out of place, onto the edge and looked like it was going to fall off.  So I timed the timer and she stirred the pot for 20 mins.  I didn't take any photos because I was just too tired. 

I had high hopes for the pastry because of the unusual ingredients like Turbinado sugar and heavy cream. I was hoping that it will be my next shortcrust pastry to go for my pineapple tarts too.  


Blending the sugar, then the butter, flour...etc


Pour into bag and knead it..and wrap in plastic wrap to be refrigerated.


I got tired after trying to use this tiny flower cutter..took me forever and the dough was melting very fast at 1/16" thick. 


So I ended up using this other plunger normally used for pineapple tarts too...(i forgot what it is called!...) but here we call it Nestar shaped, I have no idea why though? This way also, I don't have to add additional flour to roll the dough. 

I added chocolate to my apricot lekvar hoping to add more flavor to it. I find apricot lekvar very bland on cookies (re Ishler), I like them on swiss roll but just not on cookies. So I thought adding some chocolate to it will make it look as if I had poppy seeds in them and everything taste better with chocolate isn't it?


So all these tiny pieces out of the oven. First batch I forgot to egg wash..and the second batch with egg wash looked prettier, more yellow and glossy. 


Honestly, I was very disappointed!! I'm a crust person, so crust is very important to me than the filling. But it tasted bland and had no buttery taste.  I mean our local pineapple tarts pastry just used simple ingredients like butter, icing sugar, cornflour, flour with simple mixing and taste so much better - soft and crumbly and melts in mouth, but with buttery taste. If we wanted milky, we add a little bit milk powder.  Sorry, I cannot help but compare because I was expecting more from this pastry recipe. 

And in case you were all wondering, chocolate didn't help the apricot lekvar. It still tasted pretty bland. :(  I was actually quite thankful that I didn't use up my pineapple jam for this recipe. Pineapple jam took me 3-4 hours to stir it down to a thick jam paste...so would have been wasted on a bland pastry.  

Overall: Bland. 
Nobody in my family really liked or dislike. 
They were like forgettable. 

and I was quite sad the whole day
...and didn't help that I was watching last 2 episodes of the Korean drama in which the father died of cancer.
I cried a lot that night. 


Monday, February 23, 2015

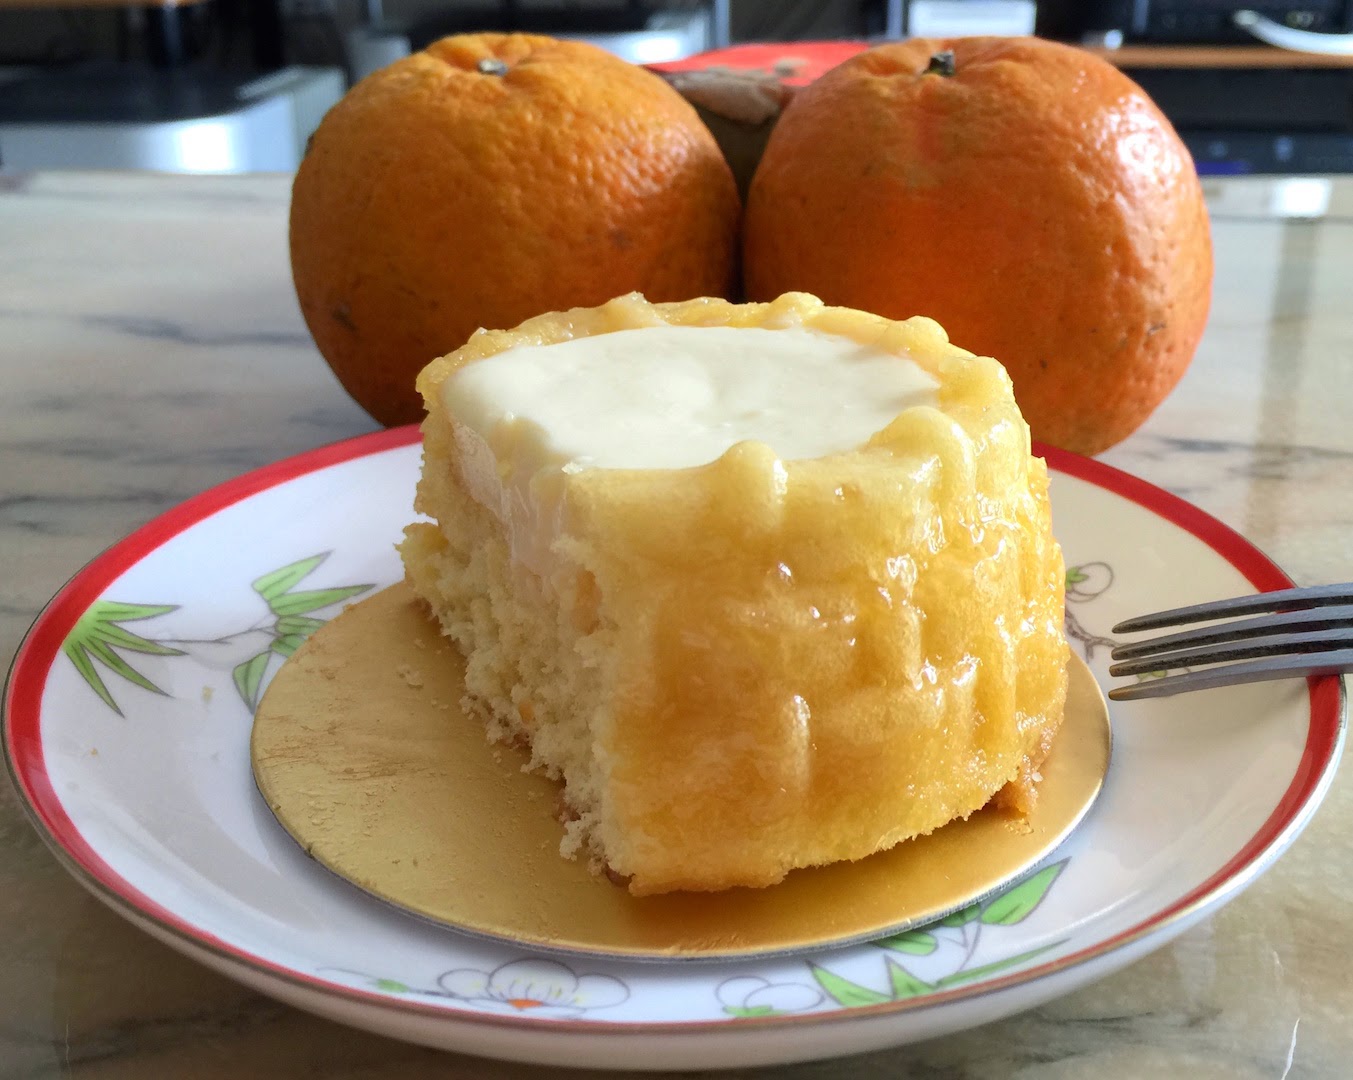
TBB: Lemon Posset Shortcake


HAPPY NEW YEAR!  
WISHING EVERYONE GOOD HEALTH & PROSPERITY! 


Recipe actually looks more intimidating than it actually is.  I made the posset first because it needed time to set.  And after making the posset, everything seemed to fall into place quite easily. :)  I pour the lemon posset into 3 mini shallow pie dishes..I think if I read correctly, as long as the posset is not above 3/4" should be ok.


I had clarified butter in my fridge. So I just measured out from that small plastic container on the left, right in front of the French Pear Gelee. 


Next, I made the sponge cake. 
Since I have Hong Kong flour or what we call here as Super Lite flour, which is lighter/same as Pastry Flour? (not sure!).  I used that instead of substituting.  Worked very well. 


You can see I used the tiny mixing bowl. Only little batter, so small bowl beats up better imo.


The mini sponge cakes out of the oven.  They were so fragile, I was afraid of damaging them.

The first few came out beautifully, the last 2 not so good...but still ok, no major damage.


I searched high and low for Apple Jelly!  Finally found this French Pear Gelee. I figured they will work the same... apple and pear same family right? lol!... and Gelee sounds like Jelly..so must be same too. LOL!  


Mixed 1/4 cup with water. 


Microwave till liquid. 
Reminder to myself. Next time microwave only when you need to use it! It hardens up again quite fast!  


All syrup & glazed!  
The in-between waiting made me a bit impatient...but time passed by quickly because I was baking pineapple tarts at the same time. :)


Posset out from the fridge and the top part is hardened with oil/fats! 
Put the top part and then put back in fridge. 


All filled up..but I couldn't wait to try! LOL! 


Ok.. at least I waited for them to rest 1 hour in the fridge and took it out to try!
The lemon posset still not set yet..but it tasted sooo good!! 


The next day, after overnight in the fridge, the posset finally hardened totally.  No more dripping posset..


Still as yummy! A bit of sweetness and a bit of tartness. 
Nice balance of flavors. 

Absolutely Delicious!!!


diary of Faithy, the baker Copyright © 2009 Cookiez is Designed by Ipietoon for Free Blogger Template