Monday, May 17, 2010

Baby Lemon Cheesecakes

Rose's Heavenly Cake, Page 327: Baby Lemon Cheesecakes

Recently, i've been sick...from stomach flu, to cold, to a very bad headache on Sunday. Finally managed to find time today after work to bake these.  Since I had little time to bake these, instead of baking the sponge cake, i made gingerbread cookie crust (recipe page 252).  I baked them in non-stick paper souffle cups, so i'll have less to wash up after..lol!   Paper cups cannot be submerged into water, so i place a huge tray of water below the baby cheesecakes - my logic is that the water below will create steam similar to that of waterbath.  

I baked at 170c for 20mins..but judging from the tray below, i think should be just 15mins cos the right side cheesecake is over baked.. a bit sink at the centre but the ones on the left side is smooth and nicer..(uneven heat in my oven..)


Once the cheesecake cooled, the sides will move away from the paper and there's no problem removing the cheesecake after cutting away the paper.  


Oh, and i forgot, i didn't make any lemon curd.  Instead i used the orange curd (recipe on page 180). 
I made extra batches of orange curd a while back and kept it in the freezer.  


VERDICT: It's sooo yummy! The chewy cookie base and the soft cheesecake and the sweet orange curd blends in really well.  Not sure if it would taste better with lemon curd, but i have to say that i love the orange curd flavor paired with this.  My family loves it! :D  Definitely a keeper!


Saturday, May 8, 2010

Toy Car Cake


I'm really happy how this cake turned out esp when I wasn't feeling well and didn't really feel like making this cake.  However, after reading Friday's daily bread devotion (http://odb.org/2010/05/07/becoming-inclined-to-god), i managed to complete this cake. Thanks to God & Praise the Lord! :) 

Cake alone is 16" x 12" and it's quite huge & very heavy.  Chocolate Cake with Chocolate Buttercream.  

Happy Birthday Daniel! :D

Monday, May 3, 2010

Saint-Honore Trifle

Rose's Heavenly Cakes, Page 227: Saint-Honore Trifle

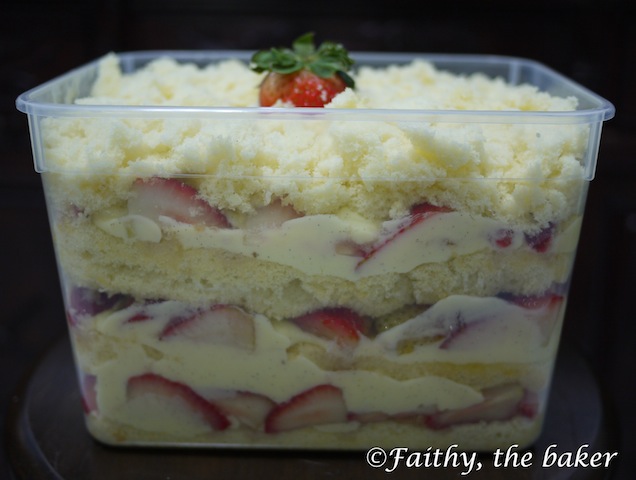
I had a hard time finding a trifle bowl..i thought of using my glass mixing bowl but decided  against it as the  gradual round up won't be easy to cut imo. So in the end, i finally opted to use a disposal plastic container instead..LOL!

Somehow this weekend, i was feeling quite lazy. Not sure if it is because i just recovered from stomach flu and feeling the lack of energy.  The recipe called for clarified butter..i was too lazy to clarify butter so i used the Ghee in my pantry instead.  Surprisingly the cake turned out quite well..:p  Also i didn't do spun sugar even when i had initially planned to do (i actually had my new whisk cut off for this purpose)...cos my very efficient domestic helper cleaned up my kitchen & stove so quickly and i didn't have the heart to mess it up again - we all know spun sugar can be messy and attract ants...


Instead of baking the cake in 9" round, i baked it in a jelly-roll pan for 10-15mins.  The cake turned out even and flat.  After this photo, i forgot to take anymore step-by-step photos..lol!..it's definitely not easy to take photos while baking at the same time... 

Cut the cake into 4 rectangles..and layered as instructed. I omitted the syrup since i didn't want a too sweet cake.  Somehow the top cake layer ended up too small for the container so i crumbled it and place it on top of the strawberries & chiboust cream.   The good thing about using this disposal air-tight container is that i can put the lid on and place it back in the fridge - locking in the moisture (i think).. :D!  Also good idea if i had to carry this cake off for a potluck dinner/party.  But definitely not as pretty though..would have been much prettier & classier if in a trifle bowl.

Er.... so now how do i cut this cake?!? LOL!  


Verdict: Since i wasn't sure how to cut this..i just used a large ladle to spoon the layers out.  The Chiboust Cream is to die for..yums! I could just eat the chiboust cream on it is own!  To me, this trifle tasted like the french version of strawberry shortcake (with genoise sponge cake & chantilly cream).  I love strawberry shortcake, so of course, this is delicious! Everyone in my family adores it..esp. my domestic helper..her fave so far cos it has loads of strawberries in it and her birthday is coming soon, so i might make this again for her birthday...:D 

Tuesday, April 20, 2010

[MacTweets/ma7] Rum & Raisin, Pina Colada & Earl Grey Tea Macarons

I made these macarons 2 days before Jamie & Deeba posted Mac Attack 7. I got the dates all mixed up..i thought i was making for Mac Attack 6 but in fact i missed the deadline! :p Since i have yet to blog about them, i figured i might as well incorporate them into this month's MacTell Me-A-Story.  My favorite story book while growing up was Lewis Carroll's Alice in Wonderland. Mad Hatter's tea party scene comes right to my mind...and those little cakes that shout "Eat Me"....even more so after I recently watched Tim Burton's version of Alice in Wonderland. I had a couple of ideas for my macarons but couldn't decide which would taste better so ended making all the 3 flavors. I did this after work and it was not a good idea because i baked till after midnight and almost 2-am before i could go to bed. I'm as crazy as the Mad Hatter i think, at times that is..;p... and i had to remind myself AGAIN never to bake all 3 flavors at one go esp. after work!  


Rum & Raisin Macarons
Vanilla Macaron Shells, White Chocolate Rum Buttercream with Rum Raisin Jam centre


Pina Colada Macarons
Coconut Macaron Shells, White Chocolate Rum Buttercream with Pineapple Jam centre


Earl Grey Tea Macarons
Earl Grey Macaron Shells with Honey Buttercream


Rum & Raisin Macarons, Pina Colada Macarons & Earl Grey Tea Macarons


Rum & Raisin Macarons, Pina Colada Macarons & Earl Grey Tea Macarons


Macarons shells all matched up..i still suck at piping even size macarons..
so have take time to match them in their respective sizes..lol!

This time, basic macaron recipe (italian method) is taken from David Lebovitz post on Pierre Herme's Ketchup Macarons.  After doing 3 batches of macarons in italian meringue..i find that the folding of meringue is extremely tough compared to the french way...towards the 3rd batch, my arm and wrist felt like it was going to fall off my shoulder..but then does make chewier macaron shells though.. Also italian way is more forgiving too imo....my 1st batch of Vanilla shells, the sugar didn't really dissolve and had lots of sugar crystals stuck on the pan but my shells turned out ok. The 2nd batch, the Earl Grey Tea shells, the sugar syrup was a bit caramelized..but my shells were still ok. The 3rd batch, the sugar syrup was finally correct and of course the shells turned out great. :)  My conclusion: Pierre Herme's recipe is definitely a keeper! :D

Among the 3 flavors, thumbs-up to my Rum & Raisin flavor!! :D Everyone loved it (me included!..i like the rum in it..lol!).  Pina Colada voted as 2nd favorite. :D  Earl Grey was ok but i guess i didn't add enough of the earl grey tea powder so the flavor wasn't as distinct as i had wanted.

Please do check out other bloggers' macarons & flavors listed on http://mactweets.blogspot.com!

Monday, April 19, 2010

Two Fat Cats Whoopie Pie

Rose's Heavenly Cakes, Page 373: Two Fat Cats Whoopie Pie

I have to confess..i've never heard of Whoopie Pies until i started baking and have never tasted it before...so i was wondering what's all the hype about.  I measured all ingredients properly and followed instructions but my whoopie pies turned out looking more like pancake pies..hahahaha..see..it melted into a flat puddle. I wonder if it is because i put a silicone baking sheet underneath hence the spread. But i really didn't want to dirty my nice shiny pans which i have managed to maintained it so shiny and clean even after more than a year of usage..lol!  So with a bit of batter left, i place the in cupcake-cups and baked it..i think it's better cos at least the batter doesn't spread. 


Disappointed that my pancakes..er..i mean whoopie pies looking so flat..i didn't feel like making the marshmallow cream anymore. So i just topped up the filling using ready made Jet-Puffed...and even the ready made marshmallow cream is not cooperating with me today..it 'melted' after 2 mins...i think it is because of our humid hot weather..


VERDICT:  I have to say the chocolate cake is really good. The chocolate is very intense and the cake texture is fluffy, moist and light. I like it but i don't really know how to eat it so i used a knife to cut it into slices like a cake..lol! Initially, my family gave me the "what's this" look..but in the end they still ate it and said it's good.. lol!  I'll probably bake this again in cupcakes since i do like the texture of the cake but definitely not as whoopie pies..cos i really don't get the novelty of it all.

PS: i think i read the instructions wrongly..lol! i see other HCB's pie are all bite sized and mine was like as huge as pancakes! i should have made 6 pies in total (top & bottom = 12 scoops) but instead i made only 3..(top and bottom = 6 scoops)..lol! No wonder i was wondering how to eat it like so huge..  But my batter was downright watery though..not like the cookie dough-like see others had..*strange*..

Saturday, April 3, 2010

Cappuccino Fudge Cheesecake


When Cherie tempted me with her Cappuccino Fudge Cheesecake, i knew i had to bake it soon, esp. when i have 6 bars of cream cheese in my fridge! LOL! Yup, don't ask me why i stock up so many ..i didn't realised i had so many until i was cleaning up my fridge (cos i'm off to Hong Kong on Monday..yippee! :D).  I'm such a hoarder sometimes..or most of the time! Don't get me counting how many blocks of butter i have in my fridge ok..:p  

So..i baked 2x 9" cheesecake-s.  For 9" ingredient measurement, i used Smittenkitchen's recipe while keeping Cherie's oreo-cookie base.  I used 500g of oreo cookies (reduced fat version....not because i'm fat conscious but because that supermarket i went to had only this left!) and used 100g butter for 2x 9".   

The best thing baking this cheesecake is there's no need for waterbath (I hate waterbath!) and it doesn't matter if the cheesecake cracked on top because it will be covered & sealed with the sour cream topping.....AND best of all ..after it's done baking, you can put it right away in the fridge to cool (yup!..) no need to cool down slowly.  What more can i ask for? LOL! And on top of all these plus points, the cheesecake is thumbs-up DELICIOUS!  I'm a fan of rich cheesecake (ok..even though i can't eat a whole huge slice..but i still can eat half a slice and enjoy it..).  


The thing that frustrates me most about cheesecake is the long baking time and the cooling off time.   I find the waiting part rather torturous..esp. when i want to try how my bakes taste like asap. LOL!  I made it yesterday and had to wait till this morning to try it...so the moment i woke up from bed, i ran straight to the kitchen to unmold my cheesecake, ate a slice and then took some photos... don't i sound rather greedy and obsessed? lol!

Seriously, if you are a cheesecake, chocolate & coffee fan, this you can't miss!  I'm not a coffee person but yet this is my new favorite cheesecake...i had a slice in the morning..then in the afternoon, ate another half-slice..and probably after dinner another half-slice. :)  I can only afford half-slice since i think i have to eat some proper food for dinner cos i couldn't eat lunch earlier after the huge full slice of cheesecake.:S


PS: the piped ganache topping cheesecake is to be given away..it's not as pretty imo since i had difficulty piping the ganache on the wet-condensed top of the cheesecake when i took it out from the fridge. The one that is for my own consumption, i just poured the ganache over the top of the sourcream topping...so much easier too.  :D

Tuesday, March 30, 2010

Earl Grey Tea Cake

Keiko Ishida's Okashi : Earl Grey Tea Cake


YUMMY! This cake is seriously addictive! One bite of it and you will be craving for more. It's light & moist, the earl grey tea paired with the lemon zest really brings out the fragrant & flavor of the cake.  This cake is not sweet (the sweetness is just nice imo).  If you like really sweet cakes, add more icing sugar.  

Keiko Ishida's Okashi : Earl Grey Tea Cake (Pound Cake)

Ingredients:-
150g cake flour
1/8 tsp baking powder (i added 1/4 tsp more)
150g softened butter unsalted
150g icing sugar
15g glucose
3 eggs (abt 150g)
1/8 tsp salt
5g earl grey tea dust (from tea bags) (i added 2g of tea dust & 3g of earl grey tea powder)
15g ground almond
1 lemon zest
1 tbsp fresh milk
100g sugar syrup (50g sugar to 100g water)
2 tbsp lemon juice


1.  Preheat oven to 170C. Line a 19 x 9 x 8 cm pan.  Sift flour and baking powder twice.
2.  Mix syrup with lemon juice. Set aside.
3.  Beat butter, icing sugar and glucose together until light and very fluffy. Gradually add eggs and beat well, then add salt, tea dust, ground almonds and lemon zest and milk. Mix well.
4.  Add flour mixture and fold through completely using a spatula. Surface of batter should be glossy and smooth.
5.  Pour batter into prepared cake pan and make a lengthwise dent in the middle with a spatula. Bake for about 50 mins (baking time may vary according to your oven).
6.  When cake is done, remove from pan & peel off parchment. Place cake on wire rack and brush with sugar and lemon syrup while still warm.  Cool completely before serving. If storing, wrap with cling wrap.

Monday, March 22, 2010

Peanut Butter Ingots vs Green Tea Financiers

Rose's Heavenly Cakes, Page 317:  Peanut Butter Ingots

I thought it would be a great idea to bake 2 different types of financiers and since i've been wanting to try out Keiko Ishida's Okashi (she's Japanese, went to pastry school in Paris but now relocated to Singapore and teaches here) green tea financiers. Afterall both recipes have more or less similar ingredients...so it was easy to bake them together without more work. :)

Toasted the blanched almond slices & grind into powder

After heating the butter - left over brown milk solids on pan & filter paper.

Beurre Noisette - clarified & brown butter.

HCB's Peanut Butter Ingots

Green Tea Powder

Okashi's Green Tea Financiers

Opps, as you can see my financiers were a bit burnt on the top because i was watching the scary movie "Stepfather" and didn't realised that the financiers were done before the 20mins. :p... Only the top was a bit burnt but the inside was still moist and soft. 

Verdict: Rose's Heavenly Cake's Peanut butter ingots taste great and nutty.  Okashi's green tea financiers has a lighter texture and is less sweet.  I like Okashi's green tea financiers better because green tea is my all time favourite, it is not as sweet, lighter in texture plus the recipe is very easy, ie, less hassle and very straight forward.   Nonetheless, both the peanut butter & green tea versions tasted great.  My daughter who's not a green tea fan actually liked the green tea financiers better because it has more flavor. My husband said both are equally good.  

Green Tea Financiers

Pastry Flour          50g
Corn Flour             5g
Baking Powder     1/2 tsp
Egg Whites            130g
Castor sugar           130g
Ground Almonds    50g
Salt                          a pinch
Unsalted Butter       130g
Green Tea powder  10g

1. Preheat oven to 220c. Lightly grease the cake moulds with a little softened butter and place them on a baking sheet. Sift flour, cornflour, green tea powder and baking powder together twice.  

2. Place egg whites into a clean bowl and beat lightly with a hand-whisk. Add sugar, ground almonds, flour mixture and salt each at a time and mix well without over mixing. Set aside.

3. Brown butter in a small saucepan over medium low heat, whisking frequently until fragrant and golden brown in color.  Pour butter into a mixing bowl. Place the bowl with browned butter into a larger bowl half filled with ice water to stop it from cooking further and burning. (Beurre Noisette)

4. Add brown butter to flour and almond mixture and mix well.  Spoon batter into the prepared moulds. 

5. Bake financiers for 10-15 mins until they are light golden in color. Remove from moulds and cool on wire racks. 

Friday, March 19, 2010

Oatmeal-Raisin Crisps


Recipe from the book "Cookies, Brownies & Bars" by Elinor Klivans.  This is a very easy & quick recipe and the cookies are amazingly yummy. I like the chewiness of it. I guess it is because of the oatmeal that gives this cookie a chewy texture. This is my new found favorite cookie besides the cornflake cookies.  The recipe below gives very sweet cookies (as with all American recipes i find), so if you do not like too sweet cookies, dont pack the brown sugar firmly and reduce accordingly.  

Oatmeal Raisin Crisps
(from cookies, brownies & bars, by Elinor Klivans)
yield: 40 cookies

Ingredients:-

2 cups        apf
1 tsp           baking soda
3/4 tsp        baking powder
1-1/2 tsp     ground cinnamon
1/2 tsp        salt
1 cup          unsalted butter @ room temp
1 cup          brown sugar firmly packed  
1 cup          granulated sugar
2                 large eggs
2 tsp            vanilla extract
2-1/2 cups   old-fashion rolled oats
2 cups          raisins

Method:-

1. Preheat oven to 350F/180c. Line cookie sheets with parchment paper.
2. In a bowl, sift together flour, baking soda, baking powder, cinnamon and salt; set aside.
3. Combine butter, brown sugar, granulated sugar. Using a mixer on medium speed beat until well blended about 1 min. Add eggs and vanilla and beat on low speed till the eggs are completely incorporated, scarping down the sides of the bowl occasionally.  Slowly add the flour mixture and beat on low speed just till incorporated.  Add the oats and raisins and beat until incorporated.
4. Place heaping tablespoonfuls of dough 2-1/2 inches apart on the prepared cookie sheets. Bake until the cookie tops are evenly golden, about 11-14mins.
5. Let the cookies cool on the sheet for 5mins then transfer then to wire rack to cool completely.

Monday, March 15, 2010

Sicilian Pistachio Cake


Rose's Heavenly Cakes, Page 65:  Sicilian Pistachio Cake

I didn't intend to bake this cake because i was tired after baking and decorating the Alice in Wonderland Cake on Saturday.  However, after reading what great reviews by fellow HCB's Mendy, Monica, Vicki & Marie had of this cake, i just knew i had to bake it even if it means baking after work.  

So i got home after work around 8pm and got ready all my ingredients by 830pm. I had to blanched pistachios since i can't find already blanched ones.  Since i had only limited time before bedtime, i did the shortcut way, ie, i microwaved the pistachios in water for 1 min and transferred to a bowl of cold water and removed all the skin quite quickly. :)  Yup, only 1min in microwave and the water was really hot and the pistachio skin peeling off. Then i continued the recipe from there....process the blanched pistachios with sugar etc...  The batter was quite easy to make and in no time it was in the oven already.  

Next was the buttercream which requires heating of the sugar syrup. I did the shortcut way again and microwaved the sugar syrup..:p  I put all the ingredients in the measuring glass then microwave it on a spurt of 30secs x 3 (stir after 30secs so the sugar will dissolve) and then after 3rd 30secs, the sugar should be all dissolved and i microwaved it for a further 1min. And by that time the sugar is all thick and ready to be added into the egg yolks.   I like how the yolk sugar mixture thickens after it cool down. :)   I didn't have pistachio essence, so i added pistachio paste i had in the fridge.

I was a bit alarmed when i saw my cake domed quite badly in the oven and i did put on the cake strip you know. However the dome subsided a fair bit (it's still there, you can see above photo) after cooling so it wasn't that bad anymore.  I blasted a fan to cool the cake down so i can quickly frost the cake asap. :S  I have never frosted & decorated a cake so quickly before..but for this, i did it in like 5mins or less and I'm at amazed at myself too..hahaha..not my best but i think not too bad for last min job.  By the time i'm done it was still slightly before 12am..:)

Oh..and i forgot to add that the nuts on top are toasted pistachio nuts since i ran out of blanched nuts, i decided to just toast it instead of having to blanched again (er..i blanched only 1/2 packet of nuts earlier since i was only testing if blanching works in microwave..). Quite good cos it gives the crunchy effect when eaten with the cake. lol!  And i suspect that my cake domed a little in the centre because i didn't dry the blanched nuts enough while i processed it with sugar. :S 

VERDICT:  Normally i don't eat supper at all, for this post i just had to sacrifice my waistline a bit to taste it so i can write what i think about this cake right? I took a slice and oh my, it was without doubt, DELICIOUS! No wonder Marie said she couldn't stop eating the cake and took 3 slices! LOL! My daughter, my husband and even my domestic helper all took a slice (they all don't eat supper too!) and they all loved it - said the pistachio blends very well in the butter cake, paired with the buttercream it was pure heavenly! :)  I didn't regret baking it but i think i would very much have regretted if i didn't bake it...yes, it is that good!   

PS: Since i'm typing this at 1235am, half asleep already, i think what i just wrote made sense..if not, it'll be corrected the next day when i'm more awake..lol! And i'm really quite tired of my flowery plates..always using the same plate to take photo..


Sunday, March 14, 2010

Alice in Wonderland Cake


It's my daughter's turn to bring a cake to Church for Youth Fellowship for the month.  I decided to make an Alice in Wonderland's cake after watching Tim Burton's 3D movie.  Don't ask me why, but i just love the story of Alice in Wonderland since young.  

Thanks to a very generous flickr-friend Taya @deliciouslydecadent for her topsy turvy cake tutorial that i finally plucked the courage to do this. However, i did a lousy job! LOL! I cut the cake the wrong way, ie, i cut it in the opposite way (instead of a pyramid, i did a cone..) and i realised my mistake a bit too late. And to salvage it, i did everything the wrong way to get it right. LOL! Then i  place the top tier a bit off the centre... er....yup..i don't know what's wrong with me..i don't see it until i get everything done and then noticed it is off the centre. But I'm quite happy with my 'un-planned' last minute design and my inspiration is from other flickr members - Genevieve @forloveofcake and Rebecca @sweetcakesbyrebecca.  Needless to say, of course their design is 1000x better than mine. :))

The problem with me is i don't know how to plan & design a cake. This cake design just came up as I went along.. I asked my daughter who is into design (she plans to study it as she enters into university this year) to help me think of something and she fell asleep while thinking - so much for counting on her!?!?  I actually had some ideas in my mind but as i was doing it, i completely forgotten and colored the top tier fondant in the wrong color. So i had to just add whatever i thought of as i went along.   Also i spelt the Happy "UN-Birthday" wrongly...and NOBODY at home noticed it.. aargghh.. until when the cake was about to be cut..someone then noticed it!  


Here's the left over cake.  Coffee cake with coffee buttercream & white chocolate coffee ganache.  A lot of caffeine in the cake. I think you don't have to drink coffee after eating a slice of this! LOL!   

Wednesday, March 10, 2010

Strawberry Cheese Bread


After reading & salivating over Jane's (of Jane's Sweet & Baking Journal) post on Strawberries & Cream Muffins, i had every intention to bake her muffins on Sunday since they looked very delicious and so tempting..lol!  Check out her blog and her post (both links are given above) and you will know what i mean. :D

However, i got side-tracked after going through some books i haven't been reading for a while and saw a similar bread recipe with strawberries & cheese by Alex Goh from his book "Magic Bread" using gelatinized dough.  I made Butter Sugar Bread from his Magic Bread book before and his bread recipes never failed me, always so soft and chewy and has a longer shelf-life compared to the rest of the other bread i've baked before, ie, it stays soft and chewy the next 2 days without the use of bread addictives/improver. 

Also it would be a waste not to bake bread in this hot weather...proofing is so fast & easy..lol!  I'm glad i baked these buns! I love the strawberries & cheese filling in the bread and the streusel topping adds to the crunch. 


Strawberry Sweet Bread
from Magic Bread by Alex Goh
(Basic recipe for his dough link can be found here (or see below))


1. Divide sweet bread dough into 70g each and mould it round. Place it onto a 11cm round baking cup mould.
2. Place it in warm place and let it proof for 40mins.
3. Egg wash the surface. Pipe strawberry cheese fillings in the centre of bread, then sprinkle some streusel over it.
4. Bake at 180c for 15 mins.


Strawberry Cheese Fillings
125g cream cheese
50g  sugar
50g  whipping cream
10g  custard powder
3 pcs of fresh strawberries chopped


Cream cream cheese & sugar till light. Add in whipping cream and cream till smooth.  Add in custard powder and mix until well blended.  Add in chopped strawberries and mix till combined.


Streusel Topping
60g sugar
50g butter
100g bread flour


Mix sugar and butter by hand until crumbles. Add in flour and mix till crumbles. Keep it in fridge. Use it to sprinkle on top or coat the surface of dough.


Basic Sweet Dough Recipe
(taken from Magic Bread by Alex Goh)

Ingredients:-

A) 100g Bread Flour
70g boiling water

B) 300g bread flour
100g plain flour
80g sugar
6g salt
20g milk powder
9g yeast

c) 175g cold water
60g cold eggs

D) 60g butter

1) Add boiling water from A into flour, mix until well blended to form a dough. Cover and set aside to cool. Keep it into fridge for at least 12 hrs.
2) Mix B until well blended. Add in C and knead to form rough dough. Add in A and knead till well-blended.
3) Add in D and knead to form elastic dough
4) Let it proof for 40mins.
5) Divide the dough into required weight and mould it round. Rest it for 10mins and ready to use.


Monday, March 8, 2010

Chocolate Apricot Roll with Lacquer Glaze


Rose's Heavenly Cakes, Page 163: Chocolate Apricot Roll with Lacquer Glaze

This recipe is 5-pages long...and by the time i'm on last page, i forgot the what i read on the first page..LOL! So i had to read each section on its own and make the related ingredients required on different days.  

Day 1 (Wed):  Decided that i should make the Lekvar first since i had no idea what it was but nonetheless i like apricot so figured i should just make it instead of going for the 'short-cut' suggested in the book. So, after work, i got ready the ingredients and soaked the dried apricots. Only then did i realized that i have to soak for 2 hrs which by that time will be midnight so i left the apricots to soak overnight in the fridge.  

Day 2 (Thurs): Realised that after soaking for 24 hrs, the apricots were very soft. But i still followed the instructions to boil the apricots till soft and process it.  Couldn't stand the sight and idea of not knowing what to do with my skinless lemon after zesting it, i added the lemon juice into the processed apricot. :p  Didn't do any harm i guess cos my jam still tasted great and very apricot-y.

Seriously, imo DO NOT skip making this!  Believe me..lekvar is amazing stuff!  I realised I still had plenty of time before bedtime, did more reading of the recipe and ended up making the apricot ganache filling, apricot syrup and lacquer glaze :)  


Day 3 (Sat):  Baked the Biscuit Roulade.  Pretty easy & quick.  The half-sheet pan i own was like 1/2-inch shorter on one side...can't remember which side but i guess it didn't do much harm.  Baking at 230c was kind of a torture (in my small kitchen can feel the oven heat!) since the weather here has been at around 34c-37c but thankfully it was only for about 6 mins. This is my 2nd time making swiss roll so i was a bit apprehensive of rolling the roulade but everything went on smoothly. :)  


Above pic: Spreading the syrup, lekvar & ganache. You can see at room temperature, my ganache was way too soft! I guess room temperature probably was at 31c..lol!  Rolling the roll with soft ganache was quite difficult..cos the ganache tends to ooze out from the sides and thus i couldn't roll it too tightly.  Next time i'll have to use ganache straight out of the fridge instead of leaving it to room temperature.  Pouring the lacquer glaze wasn't that bad either..maybe because of our weather, it allowed me time to smooth it with a spatular and still remained smooth & shiny.  I used Hersey's special dark cocoa powder for the lacquer glaze in case any one of you wonder why my glaze is so dark. 


VERDICT:  SIMPLY HEAVENLY!!  The lekvar blends very well with the apricot ganache and compliments the soft biscuit roulade.  The sweetness was just nice. Cake has a lightness to it and can eat a few slices and not feel sick.   I love it the hint of apricot with chocolate.  The best part of the cake is the lekvar.  I'm so glad that i took the time to make it - now i have a huge bottle of it left, i can find ways of using it. :D.   My family loved the cake and said it is very good.  Worth all the effort making it! :)

Thursday, March 4, 2010

White Chocolate Cake Balls


What to do with left-over cake scraps again..lol! I used a bit of leftover buttercream to put the scraps together and rolled them into balls; coat them with white chocolate and sprinkle little chocolate-rice & hearts and there they are...yummy white-chocolate cake balls!  :) Surprisingly they tasted better than what i had expected.  I should have freeze the cake balls before dipping them into the white chocolate because i didn't, the cake mixture was seeping a bit into the white chocolate so i had difficulty handling it and hence the white chocolate coating isn't very smooth. :P


Monday, March 1, 2010

[MacTweets/ma5] Spring Fling: Yuzu RedBean Macarons


Yuzu Macarons Shells with RedBean centre & Yuzu/Lime Buttercream.

I had a hard time coming up with flavors for Spring since I live here in the tropics where it is Summer all year round and right now we are experiencing the hottest period ever!  All i can think of is ice-cream, ice-water, ice-kachang (local dessert made of ice!)..

I finally thought of Yuzu flavored macarons since i just bought a bottle of yuzu paste. It smells very much like tangerine/mandarin oranges..and i like anything orange. :)   I paired the Yuzu macaron shells with redbean centre & yuzu/lime buttercream.  

This time I wanted to try a different macaron recipe so i settled on Veron's @ Kitchenmusing.com  italian meringue recipe. You can find her recipe here.  She's a very talented lady and she uses the original recipe by Pierre Hermes having been to his macaron classes.   The recipe isn't too difficult and her instructions are pretty clear.  However, i had a hard time folding in the egg white. For this method, I find I needed a lot of strength to fold and  macaronnage which i find quite tiring!  

<Note>: I realised that the macarons from this recipe is more chewy with better texture and even though the recipe seems to have a lot more sugar, it doesn't taste any sweeter than the other macaron recipes i've tried before. Recipe definitely a keeper despite the fact that i have difficulty folding in the meringue. LOL! 

Please do check out other bloggers' macarons & flavors listed on http://mactweets.blogspot.com!


diary of Faithy, the baker Copyright © 2009 Cookiez is Designed by Ipietoon for Free Blogger Template